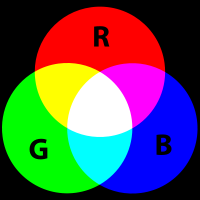
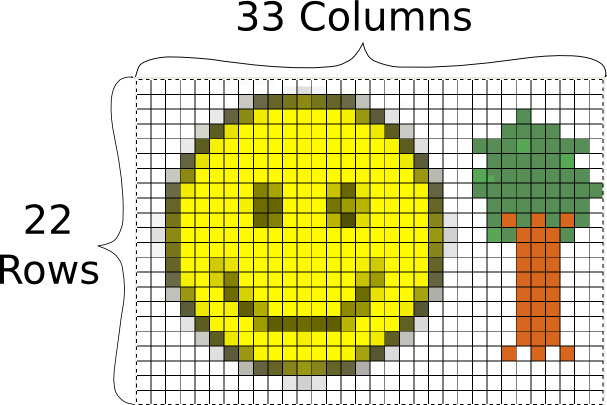
Photo files are stored in what is called a "raster" format. This means that the image is composed of a grid of points (in rows and columns). These points are called pixels, and they contain the color for that point. The number of rows and columns that make up the grid are called the dimensions. A picture that has 33 Columns (width) and 22 Rows (height) has dimensions of 33x22, and has a total of 726 pixels. In general the dimensions of digital images are always written in the form of "width x height". (http://en.wikipedia.org/wiki/2D_computer_graphics & http://en.wikipedia.org/wiki/Raster_graphics & http://en.wikipedia.org/wiki/Pixel)
Modern digital cameras have much, much higher dimensions. They are often referred based on how many millions of pixels or "megapixels" they have. Photos with more pixels are said to have a higher "Resolution" while pictures with less pixels in them have a smaller resolution. Some examples of photo dimensions and their number of pixels and megapixels are:
640x480 = 307200 pixels = 0.3
megapixels
1024x768 = 786432 pixels = 0.8 megapixels
1280x960 =
1228800 pixels = 1.2 megapixels
1600x1200 = 1920000 pixels = 1.9
megapixels
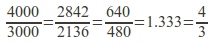
2842x2136 = 6070512 pixels = 6 megapixels
4000x3000
= 12000000 pixels = 12 megapixels
(http://en.wikipedia.org/wiki/Image_resolution & http://en.wikipedia.org/wiki/Aspect_ratio_(image) )
Looking at all these, they have something in common, if the first number is divided by the second number, they all approximately equal 1.33. The lowest ratio that equals 1.33 is 4/3, so this format of images is said to have a 4:3 ratio.
This is usually the standard for photography, when the camera is held normally - this is also known as a "landscape" orientation. When the camera is held rotated to the side, this ratio changes to 3:4 and is called "portrait" orientation. Other resolutions will be looked at more in the video unit.
The reason that cameras have grown the number of megapixels they use, is because that (with everything else being equal) larger dimensions make the image look better, especially when you print it out. A good printer can print photographs at 4800 dots per inch or dpi (http://en.wikipedia.org/wiki/Dots_per_inch ). In this case "inches" (1in = 2.45cm) and "dots" (equal to a pixel) are used because of their history in the printing industry.
This means that a 12 megapixel image (4000x3000) could be printed out to a 2.1x1.6cm image and every pixel would be visible.


However, if it were printed to a 4.2x3.2cm image, then every pixel would be represented by four dots on the paper. If the sizes were doubled again to 8.4x6.4cm then every pixel would be represented by 16 dots on the paper. This starts to become a problem when you have an image without that many pixels in it and want to print (or display it on a screen) as a large image. At some point, the individual pixels become easily visible on the printed image, and that can give it a very blocky and unnatural feeling.
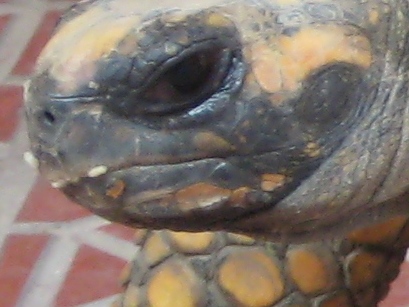
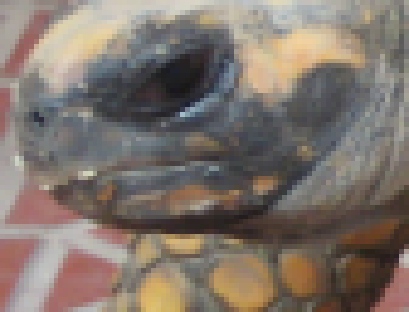
The pictures below are both the same piece of an large image taken of a tortoise. The photo on the top is from the full size 12 megapixel (4000x3000) image. The photo on the bottom was taken at a much lower dimension of 640x480. Notice how the pixels of the image are clearly visible in the lower image and it doesn't look clear.
As a rule of thumb, it is important to keep the best possible image (most pixels), at least while working with it to edit. The section on cropping and re-sizing will cover more of the trade-offs that can be made when getting a picture ready to print or put on the Internet.
In a photograph, one pixel can represent many different colors. To
express this in a computer, pixels are represented with different
"channels" for the different colors (http://en.wikipedia.org/wiki/Channel_(digital_image) ). A typical image will have
three channels: Red, Green, and Blue, for images without color, they
will have a single channel (different shades of gray). Each channel
states how strong that color is, forhttp://en.wikipedia.org/wiki/Channel_(digital_image) example a pixel that has very
strong red channel and very weak green and blue channels would show
up as red. A pixel where all three channels are very strong would be
close to white, and where they are all weak, close to black.
The following image is an example of pixels and color channels. The original image is the tiny face in the upper left corner. In the second, enlarged version of the face, you can see the individual pixels of the image, arranged in rows and columns, that make up the image. Then in the bottom, even more enlarged segment, you can see three pixels that make up a small area in the bottom-left corner of the image. This segment has the values for the Red, Green, and Blue channels written over the top of each pixel.
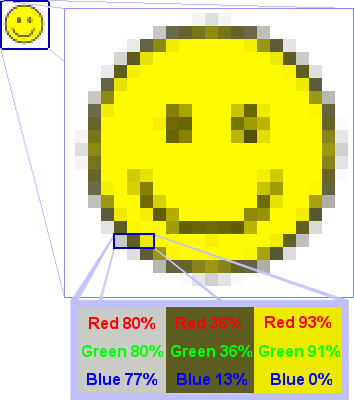
In this case we can see that to make a medium-gray color we turn the Red channel up to 80% of its full intensity, the Green channel also up to 80%, and the Blue channel to 77%. Notice that all three of these are above 50%, so in all the channel is fairly bright....this gray color is a lot closer to white than it is to black. Next, to get a dingy brown, we would put the red and green channels to 36% and the blue channel only to 13%. Because all these are significantly less than 50%, the overall color is dark and getting closer to black. Finally, to get a yellow, we turn the red and green channels almost all the way up (if we wanted a "true" yellow we would turn them all the way up) and leave the blue set at zero.
Try it out for yourself by adjusting the sliders for the amounts of
Red Green and Blue
in each channel and see what colors you can come up with.
http://developer.yahoo.com/yui/examples/slider/slider-rgb_clean.html
Some raster formats also have a channel called "Alpha" that
specifies how bright the pixel is. If the alpha channel is low, then
it would be possible for an image that is stacked behind the one
being show to show through. This is called transparency. If there
is nothing behind the image, then the default is usually black.