GIMP is a multi-platform photo manipulation tool. GIMP is an acronym for GNU Image Manipulation Program. The GIMP is suitable for a variety of image manipulation tasks, including photo retouching, image composition, and image construction.
GIMP has many capabilities. It can be used as a simple paint program, an expert quality photo retouching program, an online batch processing system, a mass production image renderer, an image format converter, etc.
GIMP is expandable and extensible. It is designed to be augmented with plug-ins and extensions to do just about anything. The advanced scripting interface allows everything from the simplest task to the most complex image manipulation procedures to be easily scripted.
One of The GIMP's strengths is
its free availability from many sources for many operating systems.
Most GNU/Linux
distributions include The GIMP as a
standard application. The GIMP is
also available for other operating systems such as Microsoft Windows" or Apple's Mac OS X" (Darwin).
The GIMP is a Free Software
application covered by the General Public License.
The GPL provides users with the
freedom to access and alter the source code that makes up computer
programs.
Resources:
Manual - http://docs.gimp.org/
http://docs.gimp.org/2.6/en/ - most current version in english
http://docs.gimp.org/2.6/es/ - most
current version in spanish, but parts are not yet translated
http://docs.gimp.org/2.4/es/
- Previous version in spanish, complete translation, but some parts are
out of date
http://docs.gimp.org/2.4/en/
- Previous version in english, some parts are out of date
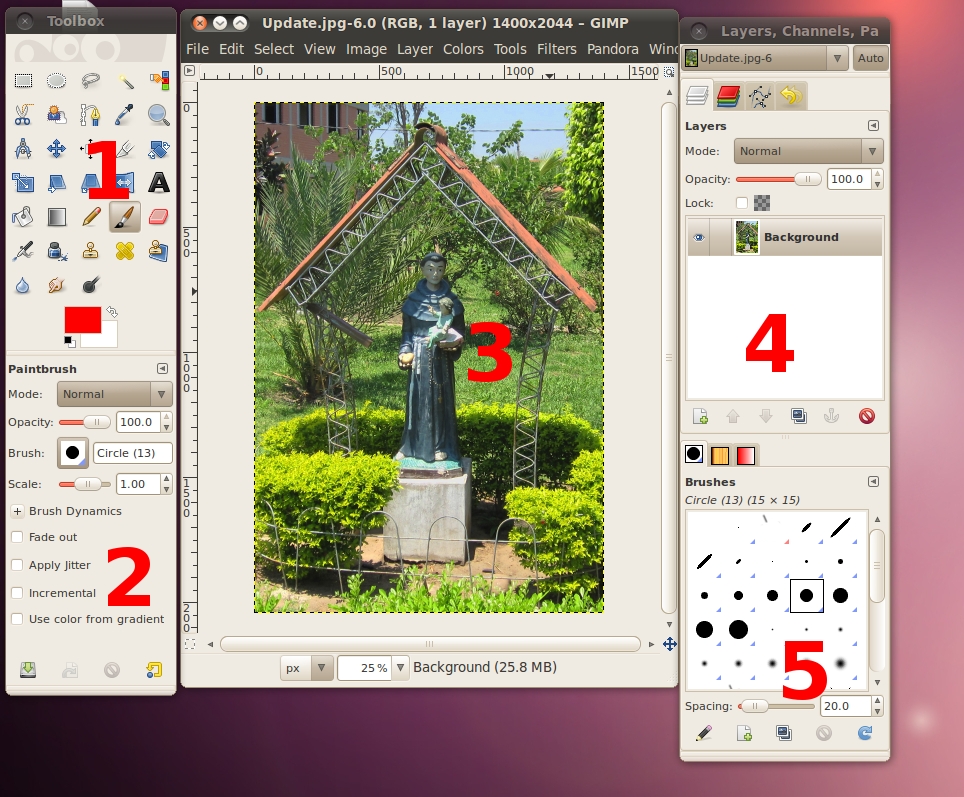
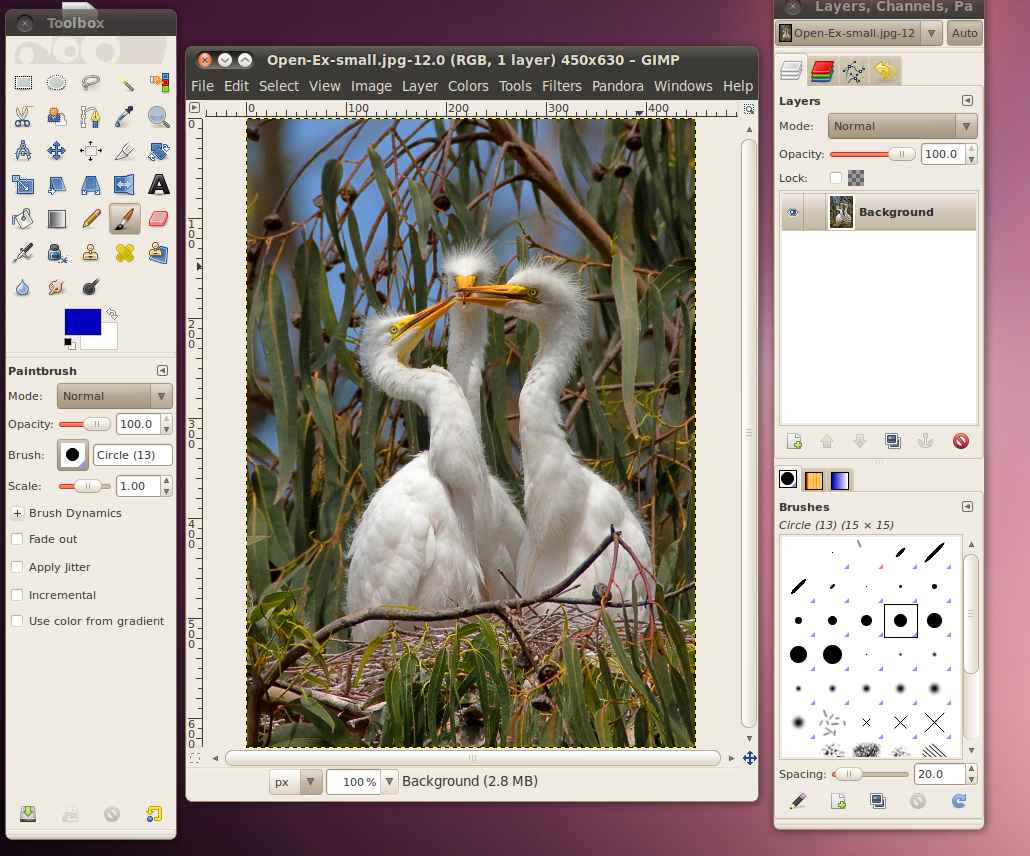
The screenshot above shows the most basic arrangement of GIMP windows that can be used effectively.
The Main Toolbox: Contains a set of icon buttons used to select tools. It may also contain the foreground and background colors; brush, pattern, and Gradient; and an icon of the active image. Use -> -> to enable, or disable the extra items.
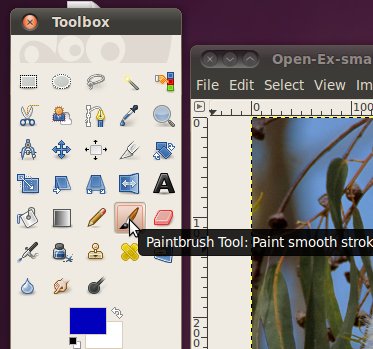
Tool options: Docked below the main Toolbox is a Tool Options dialog, showing options for the currently selected tool (in this case, the paintbrush tool).
An image window: Each image open in GIMP is displayed in a separate window. Many images can be open at the same time, limited by only the system resources. Before you can do anything useful in GIMP, you need to have at least one image window open. The image window holds the Menu of the main commands of GIMP (File, Edit, Select...), which you can also get by right-clicking on the window.
The Layers, Channels, Paths dock with the Layers Dialog open; note that there are several tabs at the top of area, each of these is a different dialog. This dialog window that is open shows the layer structure of the currently active image, and allows it to be manipulated in a variety of ways. It is possible to do a few very basic things without using the Layers dialog, but even moderately sophisticated GIMP users find it indispensable to have the Layers dialog available at all times.
Brushes/Patterns/Gradients: The docked dialog below the layer dialog shows the dialogs (tabs) for managing brushes, patterns and gradients.
This is a minimal setup. There are over a dozen other types of
dialogs used by GIMP for various
purposes, but users typically open them when they need them and close
them when they are done. Knowledgeable users generally keep the Toolbox
(with Tool Options) and Layers dialog open at all times. The Toolbox is
essential to many GIMP operations;
in fact, if you close it, GIMP will
exit after confirming that that is actually what you want to do. The
Tool Options section is actually a separate dialog, shown docked to the
Main Toolbox in the screenshot. Knowledgeable users almost always have
it set up this way: it is very difficult to use tools effectively
without being able to see how their options are set. The Layers dialog
comes into play when you work with an image with multiple layers: after
you advance beyond the most basic stages of GIMP
expertise, this means almost always.
And of course it helps to display the images you're editing on the
screen; if you close the image window before saving your work, GIMP will ask you whether you want to close
the file.
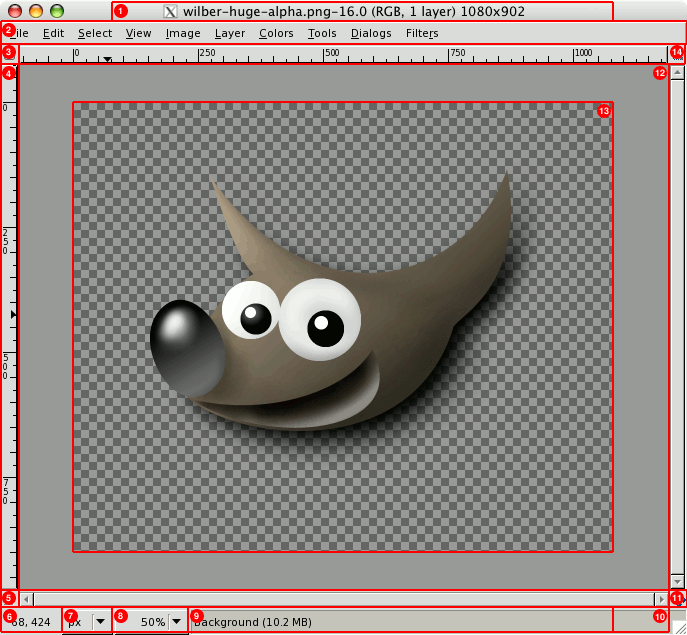
The Image Window
An image window exists, even if no image is open. The Title Bar in an image window without an image reads "GNU Image Manipulating Program". An image window with an image displays the image name and its specifications in the title bar according to the settings in Preference Dialog. Each window displays exactly one image, or no image if no image is open. Each image is displayed in one or more image windows; it is unusual to display the same image in more than one window. We will begin with a brief description of the components that are present by default in an ordinary image window. Some of the components can be removed by using commands in the View menu.
Title Bar: The top of the image window typically displays a Title Bar with the name of the image and some basic information about the image. The Title Bar is provided by the operating system, not by GIMP, so its appearance is likely to vary with the operating system, window manager, and/or theme. Use the Preferences dialog to customize the information that appears in the Title Bar.
Image Menu: Directly below the Title Bar appears the Image Menu (unless it has been suppressed). The Image Menu provides access to nearly every operation you can perform on an image. You can also right-click on an image to display a pop-up image menu, or by left-clicking on the little arrow symbol in the upper left corner, called the Menu Button:, if for some reason you find one of these more convenient. Many menu commands are also associated with keyboard shortcuts as shown in the menu. You can define your own custom shortcuts for menu actions, if you enable Use Dynamic Keyboard Shortcuts in the Preferences dialog.
Menu Button: Click the Menu Button to display the Image Menu in a column. If you like to use keyboard shortcuts, use Shift+F10 to open the menu.
Ruler: In the default layout, rulers are shown above and to the left of the image. Use the rulers to determine coordinates within the image. The default unit for rulers is pixels; use the settings described below to use a unit other than pixels.
One of the most important uses of rulers is to create guides. Click and drag a ruler into the image to create a guide. A guide is a line that helps you accurately position things or verify that another line is truly horizontal or vertical. Click and drag a guide to move it. Drag a guide out of the image to delete it; you can always drag another guide into the image. You can even use multiple guides at the same time.
QuickMask Toggle: The small button in the lower left corner of the image toggles the Quick Mask on and off. When the Quick Mask is on, the button is outlined in red. See QuickMask in the GIMP manual for more details on this highly useful tool.
Pointer Coordinates: When the pointer (mouse cursor, if you are using a mouse) is within the image boundaries, the rectangular area in the lower left corner of the window displays the current pointer coordinates. The units are the same as for the rulers.
Units Menu: Use the Units Menu to change the units used for rulers and several other purposes. The default unit is pixels, but you can quickly change to inches, cm, or several other possibilities using this menu. Note that the setting of "Dot for dot" in the View menu affects how the display is scaled: see Dot for Dot in the GIMP manual for more information.
Zoom Button: There are a number of ways to zoom the image in or out, but the Zoom Button is perhaps the simplest. With GIMP-2.6, you can directly enter a zoom level in the text box for very fine control.
Status Area: The Status
Area is at the bottom of the image window. By default, the Status Area
displays the active part of the image, and the amount of system memory
used by the image. Use -> -> ->
to customize the information displayed in the Status Area. During
time-consuming operations, the status area temporarily shows the
running operation and how complete the operation is.
Note that the memory used by the image is very different from the image
file size. For instance, a 70Kb .PNG image may occupy 246Kb in memory
when displayed. There are two primary reasons the difference in memory
usage. First, a .PNG file is compressed format, and the image is
reconstituted in memory in uncompressed form. Second, GIMP uses extra memory, and copies of the
image, for use by the Undo command.
Cancel Button: During complex time-consuming operations, usually a plug-in, a Cancel button temporarily appears in the lower right corner of the window. Use the Cancel button to stop the operation.
Navigation Control: This is a small cross-shaped button at the lower right corner of the image display. Click and hold (do not release the mouse button) on the navigation control to display the Navigation Preview. The Navigation Preview has a miniature view of the image with the displayed area outlined. Use the Navigation Preview To quickly pan to a different part of the image move the mouse while keeping the button depressed. The Navigation Window is often the most convenient way to quickly navigate around a large image with only a small portion displayed. (See Navigation Dialog for other ways to access the Navigation Window). (If your mouse has a middle-button, click-drag with it to pan across the image).
Inactive Padding Area: This padding area separates the active image display and the inactive padding area, so you're able to distinguish between them. You cannot apply any Filters or Operations in general to the inactive area.
Image Display: The most important part of the image window is, of course, the image display or canvas. It occupies the central area of the window, surrounded by a yellow dotted line showing the image boundary, against a neutral gray background. You can change the zoom level of the image display in a variety of ways, including the Zoom setting described below.
Image Window Resize Toggle: Without enabling this feature, if you change the size of the image window, the image size and zoom does not change. If you make the window larger, for example, then you will see more of the image. If this button is pressed, however, the image resizes when the window resizes so that (mostly) the same portion of the image is displayed before and after the window is resized.
Almost anything you do to an image in GIMP can be undone. You can undo the most recent action by choosing -> from the image menu, but this is done so frequently that you really should memorize the keyboard shortcut, Ctrl+Z.
Undoing can itself be undone. After having undone an action, you can redo it by choosing -> from the image menu, or use the keyboard shortcut, Ctrl+Y. It is often helpful to judge the effect of an action by repeatedly undoing and redoing it. This is usually very quick, and does not consume any extra resources or alter the undo history, so there is never any harm in it.
If you undo one or more actions and then operate on the image in any way except by using Undo or Redo, it will no longer be possible to redo those actions: they are lost forever. The solution to this, if it creates a problem for you, is to duplicate the image and then test on the copy. ( Do Not test the original, because the undo/redo history is not copied when you duplicate an image.)
If you often find yourself undoing and redoing many steps at a time, it may be more convenient to work with the Undo History dialog, a dockable dialog that shows you a small sketch of each point in the Undo History, allowing you to go back or forward to that point by clicking.
Undo is performed on an image-specific basis: the "Undo History" is one of the components of an image. GIMP allocates a certain amount of memory to each image for this purpose. You can customize your Preferences to increase or decrease the amount, using the Environment page of the Preferences dialog. There are two important variables: the minimal number of undo levels, which GIMP will maintain regardless of how much memory they consume, and the maximum undo memory, beyond which GIMP will begin to delete the oldest items from the Undo History.GIMP's implementation of Undo is rather sophisticated. Many operations require very little Undo memory (e.g., changing visibility of a layer), so you can perform long sequences of them before they drop out of the Undo History. Some operations, such as changing layer visibility, are compressed, so that doing them several times in a row produces only a single point in the Undo History. However, there are other operations that may consume a lot of undo memory. Most filters are implemented by plug-ins, so the GIMP core has no efficient way of knowing what changed. As such, there is no way to implement Undo except by memorizing the entire contents of the affected layer before and after the operation. You might only be able to perform a few such operations before they drop out of the Undo History.
Most actions that alter an image can be undone. Actions that do not alter the image generally cannot be undone. Examples include saving the image to a file, duplicating the image, copying part of the image to the clipboard, etc. It also includes most actions that affect the image display without altering the underlying image data. The most important example is zooming. There are, however, exceptions: toggling QuickMask on or off can be undone, even though it does not alter the image data.There are a few important actions that do alter an image but cannot be undone, specifically: Closing the Image, Reverting the Image, and "Pieces" of Actions.
Opening and Saving an Image